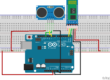
Ever wanted to give your Arduino project some long-term memory? SD card modules are perfect for that! They allow you to read and write data to an SD card, which is ideal for data logging, storing configuration files, or even playing audio files.
There are two main types of SD card modules: SPI and SD (plain). SPI is more common, so we’ll focus on that. The connections will vary slightly depending on your specific module, but they typically follow this pattern:
Pinout
- The micro SD card module is simple to connect. It typically has six pins:
- VCC (Voltage Supply): Provides power to the module and should be connected to the Arduino’s 5V pin.
- GND (Ground): Connect this pin to the ground (GND) on your Arduino.
- MISO (Master In Slave Out): This pin is the SPI output from the micro SD card module.
- MOSI (Master Out Slave In): Connect this pin to the MOSI (Master Out Slave In) pin on your Arduino.
- CLK (Clock): Connect this pin to the CLK (clock) pin on your Arduino.
- CS (Chip Select): Connect this pin to the CS (chip select) pin on your Arduino.
.


Arduino Uno

Breadboard
SD Card Module

Jumper wires
Keep in mind that different Arduino boards may have varying SPI pin configurations, so always verify the pin connections based on your specific board.
Check the table below for Arduino Uno and Mega


#include <SD.h>
#include <SPI.h>

File myFile;

int pinCS = 10; // Pin 10 on Arduino Uno

void setup() {

  Serial.begin(9600);
  pinMode(pinCS, OUTPUT);

  // SD Card Initialization
  if (SD.begin())
  {
    Serial.println("SD card is ready to use.");
  } else
  {
    Serial.println("SD card initialization failed");
    return;
  }

  // Create/Open file
  myFile = SD.open("test.txt", FILE_WRITE);

  // if the file opened okay, write to it:
  if (myFile) {
    Serial.println("Writing to file...");
    // Write to file
    myFile.println("Testing text 1, 2 ,3...");
    myFile.close(); // close the file
    Serial.println("Done.");
  }
  // if the file didn't open, print an error:
  else {
    Serial.println("error opening test.txt");
  }

  // Reading the file
  myFile = SD.open("test.txt");
  if (myFile) {
    Serial.println("Read:");
    // Reading the whole file
    while (myFile.available()) {
      Serial.write(myFile.read());
   }
    myFile.close();
  }
  else {
    Serial.println("error opening test.txt");
  }

}
void loop() {
  // empty
}
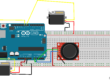
Arduino Uno
Breadboard
SD Card Module

DHT 11
Jumper wires
Keep in mind that different Arduino boards may have varying SPI pin configurations, so always verify the pin connections based on your specific board.
Check the table below for Arduino Uno and Mega

#include <dht.h>
dht DHT;
//Constants
#define DHT11_PIN 2     // DHT 22  (AM2302) - what pin we're connected to
//Variables
float hum;  //Stores humidity value
float temp; //Stores temperature value


#include <SD.h>
#include <SPI.h>

File myFile;

int pinCS = 10; // Pin 10 on Arduino Uno

void setup() {

  Serial.begin(9600);
  pinMode(pinCS, OUTPUT);

  // SD Card Initialization
  if (SD.begin())
  {
    Serial.println("SD card is ready to use.");
  } else
  {
    Serial.println("SD card initialization failed");
    return;
  }

}
void loop() {
    int chk = DHT.read11(DHT11_PIN);
    //Read data and store it to variables hum and temp
    hum = DHT.humidity;
    temp= DHT.temperature;
    //Print temp and humidity values to serial monitor
    Serial.print("Humidity: ");
    Serial.print(hum);
    Serial.print(" %, Temp: ");
    Serial.print(temp);
    Serial.println(" Celsius");

 myFile = SD.open("test.txt", FILE_WRITE);

if (myFile) {
    myFile.print("Humidity: ");
    myFile.print(hum);
    myFile.print(" %, Temp: ");
    myFile.print(temp);
    myFile.println(" Celsius");
    myFile.close(); // close the file
  }
  // if the file didn't open, print an error:
  else {
    Serial.println("error opening test.txt");
  }


    delay(2000); //Delay 2 sec.
}